Managing your team members
After the initial setup of your team, you may need to perform some administration for your team members. The Team Members page lets you perform a variety of tasks.
Inviting people
For each person that you want to use Bria with you, add a member to your team. An email to new users provides them with links to create an account or log in with an existing account.
- In the Bria Portal, click Team Members.
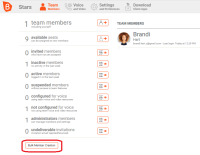
- In the Team Members page, click
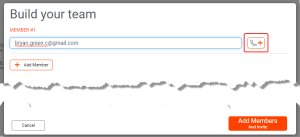
 Invite Members. The Build your team screen opens.
 -
Enter the email address of a person you want to invite to your team. If you have set up your own PBX or ITSP and you want to configure the voice settings for this team member, click
 Add Voice Configuration.
 - Add more people to the list if necessary.
-
Finish by selecting one of the options:
-
Add Members and Send Invitations Now - Your new members are saved and an email invitation can be sent immediately.
-
Add Members and Send Invitations Later - Your new members are saved, but no invitation is sent until you choose to send them later. Choose this option if you want to delay the invitations while you continue to set up the Bria Portal.
-
With this method, the members do not need to accept your invitation. However, you need to set up a password for each user, and tell each user what the password is for logging into the Bria app.
The Bulk User Creation button is disabled until you configure the first custom SIP voice configuration.
-
In the Bria Portal, click the Voice and Video tab, and add a service provider or PBX that you want to use for your team. You do not need to enter information for each user because you will be able to do that in a CSV file.
- Click the Team Members tab.
-
Click Bulk Member Creation.
-
Follow the prompt to download the template.
-
Edit the template to enter email address, password, first name and last name of the person you want to add to your team.
-
Save the file as CSV, and upload it to the Bria Portal.
-
The prompt shows the members uploaded. If an error occurs, change the information you entered previously, and try again.
-
Click Create Members. It might take a while to create all members.
-
Click Close when done.
-
Make sure to tell each member the password you set up for them to log into the Bria app.
The member receives a welcome email with links for downloading the Bria app.
For anyone in your list that has not accepted an invitation or has not yet been sent an invitation, you can send an invitation email.
-
In the Bria Portal, click Team Members.
-
Take one of these actions:
-
In the team list, click
 Reinvite Member next to the member that you are re-inviting.
 -
Click the member's email to open the edit screen and click Reinvite Member. This button is available only if the member has not accepted a previous invitation.
-
Filtering a list of members
- In the Bria Portal, click Team Members. The Team Members page opens, displaying a list of team members and totals filtered by member status.
-
Choose how to view your member list:
-
Filter the list by status - Click
 Filter in the status list: invited members, inactive members, active members, suspended members, and members configured for voice.
 -
Search for users by email - Select
 Search and enter part or all of an email address.
To remove the filter, delete the contents of the search box.
Active means that the user has logged into the Bria clients in the last week. Similarly Last Login for each member indicates the most recent login to the Bria clients. -
Giving admin access
You can add admin privileges to a team member. With admin privileges, they have the same capabilities as administrator, such as managing users, managing subscriptions, and setting up and modifying your voice services. Administrators display ![]() Team Administrator in the Team Members list.
Team Administrator in the Team Members list.
- In the Bria Portal, click Team Members.
- In the Team Members page, click the member that you want to make an administrator. An edit screen opens.
-
Select Member is an administrator in Team Administration.
A team member with admin privileges still consumes a seat for your subscription. To add a person as administrator but not be part of team communication, do the following:
Configuring voice for members
Some changes require team members to restart or re-login to their client applications. These changes are identified by ![]() Restart Client Apps. As a team admin, you can log out the user's devices to facilitate the process.
Restart Client Apps. As a team admin, you can log out the user's devices to facilitate the process.
If you integrate your own voice service or PBX into Bria, you can add a custom voice account for your team members. Typically each team member has a different username and password to connect to the voice service. Before following the steps below, you need to set up your additional voice service provider.
- In the Bria Portal, click Team Members.
- In the Team Members page, click the member that you want to edit. An edit screen opens.
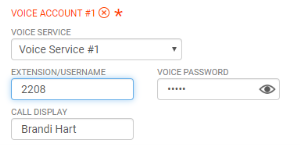
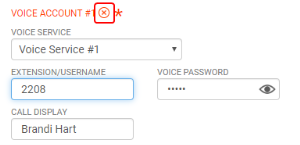
- Click Add Voice Account.
- Pick the SIP account you want to set up from Voice Service.
-
Enter Extension/Username, Voice Password, and Display Name.
If each user requires their own Authorization Username and you do not see the field, you need to select authorization username in Edit Voice Configuration.
If each user requires a unique SIP username for every device they use, set up Multi-device Configuration in Edit Voice Configuration.
- Click Save and Close or click Next Member.
Editing members
The Bulk Member Edit button allows you to edit users and their information in a grid view. In this view, you can add a member, assign a voice configuration, give them an admin access, reset password, remove a member and more.
- In the Bria Portal, click the Team Members tab.
- Click Bulk Member Edit.
- In the grid view, make changes you want.
- Click Save.
As an administrator, you can edit some of a member's contact information such as additional phone numbers, emails, and chat IDs. This contact information is shared with the team.
-
In the Bria Portal, click Team Members.
- Click
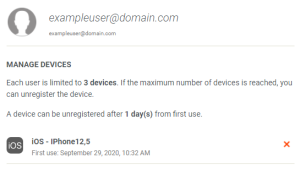
 Manage Devices for the user you want to manage devices for. A pop-up opens.
 -
Locate the device you want to unregister from the service.
-
Click
 Unregister Device for the device.
 If the icon is not clickable, it means you have to wait for a number of days to unregister, which depends on your subscription.
The device is unregistered.
Suspending a team member blocks the person from logging in with Bria. Suspensions are temporary in nature and do not delete any data.
- In the Bria Portal, click Team Members.
-
Take one of these actions:
-
In the team list, click
 Suspend Member next to the member that you are suspending. The icon turns a solid color. Click again to unsuspend.
 -
Click the member's email to open the edit screen and click Suspend Member. Click Activate Member to unsuspend.
-
Removing a team member deletes all of the member's information. This action cannot be undone.
When you delete a user, the user is logged out from all the Bria clients and will not be able to log back into the Bria clients.
- In the Bria Portal, click Team Members.
-
Take one of these actions:
-
In the team list, click
 Remove Member from Team next to the member that you are removing from your team.
 -
Click the member's email to open the edit screen and click Remove Member.
-
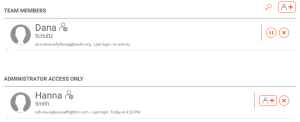
If the team member is an administrator, this member remains as administrator, and appears under the Administrator access only section.
- To delete this person completely, click
 Remove Permanently under the Administrator access only section.
 - To add this person back to the team, make sure you have a seat available, and click
 Add to Team.
What team members can do with the Bria Portal
On Bria User Dashboard, team members can:
- Download Bria apps
- Change their password
- Set their name
- Add and remove contact information to share with the team
- Upload a profile photo to share with the team





 ® logo are registered trademarks of CounterPath Corporation.