Setting up your voice service provider
Bria supports the use of Internet Telephony Service Providers (ITSPs) and custom SIP servers (your PBX).
If you are subscribing to Bria Teams, you already have a Team Voice account configured for making calls between team members. Read this topic if you already have a voice service or PBX that your team has been using and you want to use that with Bria to call non-team members. Enter information about your voice service provider on Bria Portal. It appears as a second voice account for your team members to make calls, in addition to the pre-configured Team Voice account.

Get the information
Your service provider or IT department can give you all the details you need to add SIP or ITSP information to your Bria Portal. Contact your service provider for the list of settings.
The information you need consists of two parts: the server information that is shared among all users (such as a SIP server URL), and the user-specific information such as user account and password.
Not all settings need to be specified when you set up a SIP account. Your service provider can advise as to which settings are necessary.
Enter the information into Bria Portal
After getting the information about your voice service, enter it using Bria Portal.
-
In Bria Portal menu, click Voice and Video. The Voice and Video page opens.
-
Click
 Add Voice Configuration. The Add Voice Service screen opens.
 -
Click either Configure SIP Settings or Select from Providers.
-
Fill in the form with the server settings:
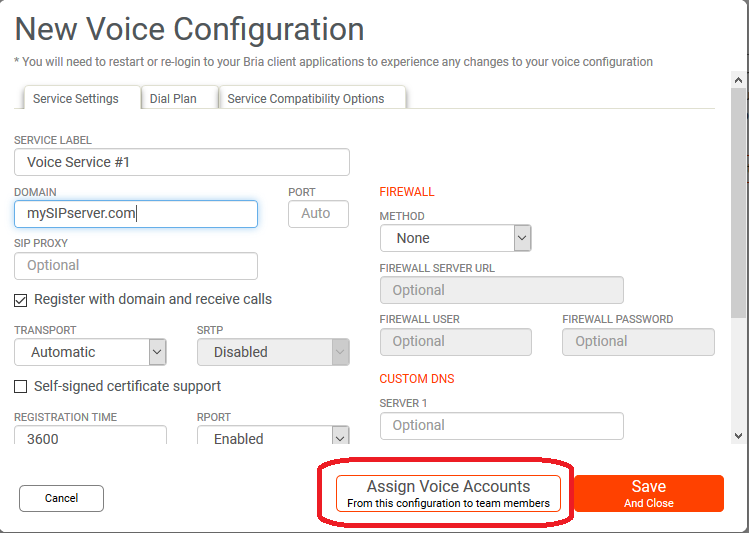
 Service settings
- Service label - Enter a friendly name for the PBX/SIP server. This name helps end users to differentiate between PBX/SIP servers in Bria.
- Domain - This is the address of your PBX/SIP server, such as zippy-phone.com or acphone.com.
- Port - This is the specific port number on which Bria communicates with the server at the specified domain. When port number is set to Auto in the admin portal, Bria uses 5060.
- SIP proxy - Optional. If it is required by your provider, or if your enterprise deploys a Session Border Controller (SBC), this specifies a proxy to use. Port number can be configured as well by separating the domain (or IP address) and the port number with a colon (for example sipproxy.acphone.com:5057).
- Register with domain and receive calls - When selected, Bria registers with your VoIP service provider so you can receive incoming calls. Clear this checkbox if your level of service does not include the ability to receive incoming calls. In this case, leaving this field selected may prevent the account from registering.
- Transport - This is the communication protocol used between the server and Bria (TCP, TLS, UDP, or Automatic).
- SRTP - This field becomes active when you use TLS for Transport. When enabled, Bria always encrypts calls, both outgoing and incoming. When disabled, Bria never encrypts calls; encrypted calls are not allowed.
- Self-signed certificate support - When enabled, the Bria clients accept the SSL certificate for TLS without attempting to verify it. Enable this option when your SIP server uses a self-signed certificate as opposed to a certificate trusted by well-known Certificate Authorities such as VeriSign.
- Registration time - This is how often in minutes that a client must send a re-registration message to the server to verify that it still exists. (Optional)
- RPort - The RPort parameter allows the Bria clients to request that the SIP server send the response back to the source IP address and port from which the request originated.
- Keep alive - When enabled, the Bria clients send keep alive messages in order to maintain a "pinhole" through your firewall for SIP signaling.
Voice mail
- Voicemail number - This is the local number to dial to listen to voicemails, such as *98 or 55000.
Firewall
- Method - The method used for the firewall in your organization, such as STUN, ICE(Auto), or TURN. Choose None if no firewall is deployed in your network. If STUN or TURN is used, ask for the server URL or IP address of the STUN/TURN server, and login credentials if required by the STUN/TURN server.
- Firewall server URL - The URL or IP address of the STUN/TURN server.
- Firewall user/password - The credentials for logging into the STUN/TURN server. Enter if required by your STUN/TURN server.
Custom DNS
Custom Name Server is a domain name server that is specific to a given domain (network or sub-network). It provides Bria the ability to query inside the network for IP addresses associated to domain names rather than querying outside the domain.
You can add up to two servers, and the Bria apps queries sequentially from the top; Server 1, then Server 2.
Service options
-
This voice service requires an authorization username for each voice account - Select this item only when your voice service requires an auth name for each user. Selecting this allows you to enter an auth name when you add a voice account to a user.

- Force outbound proxy on all requests - Typically Cleared. Select this setting only if you have trouble connecting to the SIP server. When selected, requests always go to the outbound proxy configured in SIP Proxy. Bria never sends the invite directly to the end point. If you select this field, make sure you also set SIP Proxy.
Port ranges
Optional; for example, if you have a strict firewall. Enter the port range used for SIP signaling, RTP audio, and RTP video.
Advanced Registration Options
This section applies to a VoIP service that requires a unique SIP username for each device users are using the softphone with. See Multi-device Configuration. Most SIP servers do not require device specific credentials.
-
Do one of the following:
-
If you have already invited your team members via email, click Assign Voice Accounts. Proceed with Step 6 below.
- If you have not invited your team members yet, click Save and close because you need to come back to it after inviting them to Bria Teams. See Add a custom voice account for team members for the rest of the steps.
-
-
Click
Add Voice Configuration to add a voice account to each team member.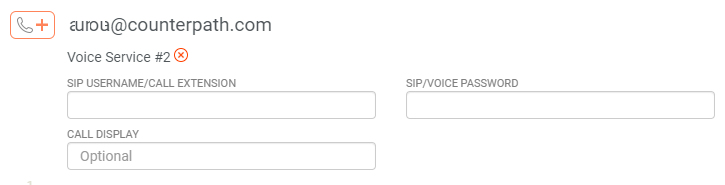
- Enter SIP Username/Call extension, SIP/Voice Password, and Call Display.
- Click Save and Close.
Test the setup
Log into your Bria client to see if the custom SIP account can register.
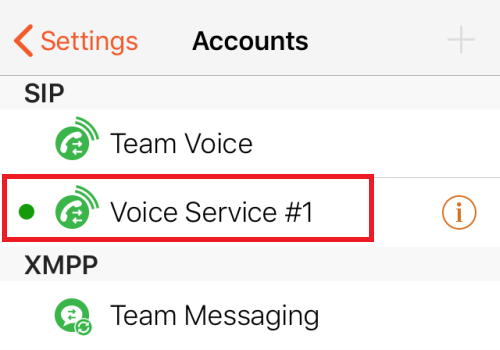
On desktop, click the arrow beside Auto Select. On mobile, go to Bria Settings > Accounts. You should see both accounts with a green icon.


If you can log into the client, but the custom SIP account is not working, it might mean that your custom SIP account is not registering to the service.
-
Make sure that you entered the correct information about your SIP server on the Bria Portal. Pay special attention to firewall settings. Contact your IT department for help with firewall settings. Contact your service provider for help with SIP server settings.
-
Make sure that you entered the correct SIP username and password in your member details. This must match the user's credentials provided by your SIP service provider.
-
Check if other users can connect to your SIP server. If many users are experiencing issues with registration, it may be an issue with your VoIP service provider.
Let the team members know of the custom SIP account
This step applies if you subscribe to Bria Teams.
Make sure to let your team members know that the custom SIP account has been configured for calling outside of your team.
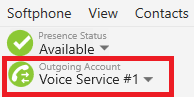
In order to call outside of your team, your team members must choose the custom SIP account as an Outgoing account. To do so, instruct your team members to do the following:
- On Bria Desktop, click Outgoing Account and select the custom SIP account you configured.
- On Bria Mobile, go to Bria, then Settings > Accounts. Tap the custom SIP account. The green dot appears beside the custom SIP account.
The user may need to log out from their Bria client and log in again for the custom SIP account to be visible to them.
More configurations
Optionally you can configure the following:
- Set up dial plans for your custom SIP account.
- Select which codecs to enable.
- Change a method to send DTMF.
-
Show SIP domains of phone numbers and SIP URIs on the Bria screens.
For example, Bria's incoming call screen shows "number@domain" instead of just "number". By default, Bria does not show domains. To change this, go to Settings and Preferences in the Bria Portal menu and select Show SIP Domains.
Note that if you have only one account in Bria, Bria does not show SIP domain even when the Show SIP Domains setting is selected.
More options for BriaTeams:
-
Set up star codes to use with your custom SIP account, such as *98 to access voicemail center.
-
Enable call recording in Bria to allow team members to record the audio of their calls.
- Add any URL in Bria for team members to access from within Bria, such as a link to an employee time sheet.
After configuring in Bria Portal, make sure to tell your team members to log out of their app and log in again to see the changes.
Editing a voice server configuration
To change the server information that you previously saved, click ![]() . When done, click Save and Close. The changes you made will take effect next time team members log into Bria.
. When done, click Save and Close. The changes you made will take effect next time team members log into Bria.
Deleting a voice server configuration
To delete a voice server configuration, click ![]() Remove Configuration. Removing the server information also deletes a voice account from team members if configured. Team members will see the account removed next time team members log into Bria. You can remove the voice account from a team member rather than deleting the voice server configuration.
Remove Configuration. Removing the server information also deletes a voice account from team members if configured. Team members will see the account removed next time team members log into Bria. You can remove the voice account from a team member rather than deleting the voice server configuration.
Some changes require team members to restart or re-login to their client applications. These changes are identified by ![]() Restart Client Apps. As a team admin, you can log out the user's devices to facilitate the process.
Restart Client Apps. As a team admin, you can log out the user's devices to facilitate the process.